How to Build D3FEND Graphs with D3FEND CAD
Explore the benefits of cybersecurity modeling using D3FEND CAD. Learn to create structured, insightful graphs that enhance decision-making and analysis.
Target Audience
Security Architects, Systems Security Engineers, Digital Engineers, Enterprise Modelers, Cyber Risk Engineers, Cyber T&E Engineers, Cyber Threat Report Writers, Ontologists
Published: Apr 21, 2025, Last Modified: Jul 30, 2025
1.1.0
Authors
Introduction
Imagine how much unstructured cybersecurity knowledge has been rendered in PowerPoint or Visio diagrams over the last two decades. Today, we aim to change that by introducing the new D3FEND CAD tool.
When knowledge is structured, you can more easily analyze it to garner new insights, spot trends, and make informed decisions.
The D3FEND Ontology provides the structure for this knowledge. However, until now, there’s been no convenient way to put it into action. With our new Cyber Attack-Defense (CAD) tool, you can create precise and specific cybersecurity scenarios (D3FEND Graphs), grounded in the D3FEND Ontology.
What is a D3FEND Graph?
Note: We will be writing more about D3FEND Graphs over the coming year. This is a very brief introduction.
Myriad representations of “attack graphs” exist in the literature and practice. These are often property graphs which conflate actions, objects, and changes to those objects. Today, we introduce the concept of a D3FEND Graph. A D3FEND Graph is a knowledge graph which comprises discrete activities, objects, and conditions and all of their necessary relationships—all conforming to the D3FEND Ontology. By necessary, we mean necessary for a particular use case. Our key goal with this initiative is to discover a nearly universal representation which satisfies as many cybersecurity use cases as possible.
The D3FEND CAD tool has been designed to get out of your way, but also guide your hand where possible. When building your own D3FEND Graphs, you will find few restrictions in D3FEND CAD, helping us understand which concepts you need in the D3FEND Ontology. If you are thinking about building a diagram, consider using D3FEND CAD!
D3FEND CAD Use Cases
Our ontology has a broad scope covering the cybersecurity domain, thus, we envision a variety of use cases, for example:
| Use Case | Roles Involved |
|---|---|
| Threat Intelligence Analysis and Visualization | - Cyber Threat Intel - Cyber Detection Engineers |
| Threat Modeling and Security Systems Engineering | - Cybersecurity Architects - Model-based Systems Engineers - Cyber Detection Engineers |
| Detailed Detection Engineering Scenarios | - Detection Engineer |
| Incident Investigation and Event Sequencing | - Incident Responder - SOC Analyst |
| Security Risk Assessment and Framework Implementation | - Cyber Risk & Compliance - Enterprise Architects - Cyber Architects |
| Cybersecurity Training Material Development | - Education & Training |
Quick Start
Diving right in, let’s model a real-world CTI report in D3FEND CAD from a cybersecurity architect’s perspective.
In the following video, we model a CTI report, sequence of actions, and recommended countermeasures. We also show how to use D3FEND’s inference to add more countermeasures.
How to use CAD
We’ll walk through the basic features in D3FEND CAD, and how to use them. For this blog post, we’ll mainly focus on creating graph nodes and relationships for Attack, Countermeasure, and Digital Artifact nodes. We will discuss other node types in future blog posts.
Creating a Node
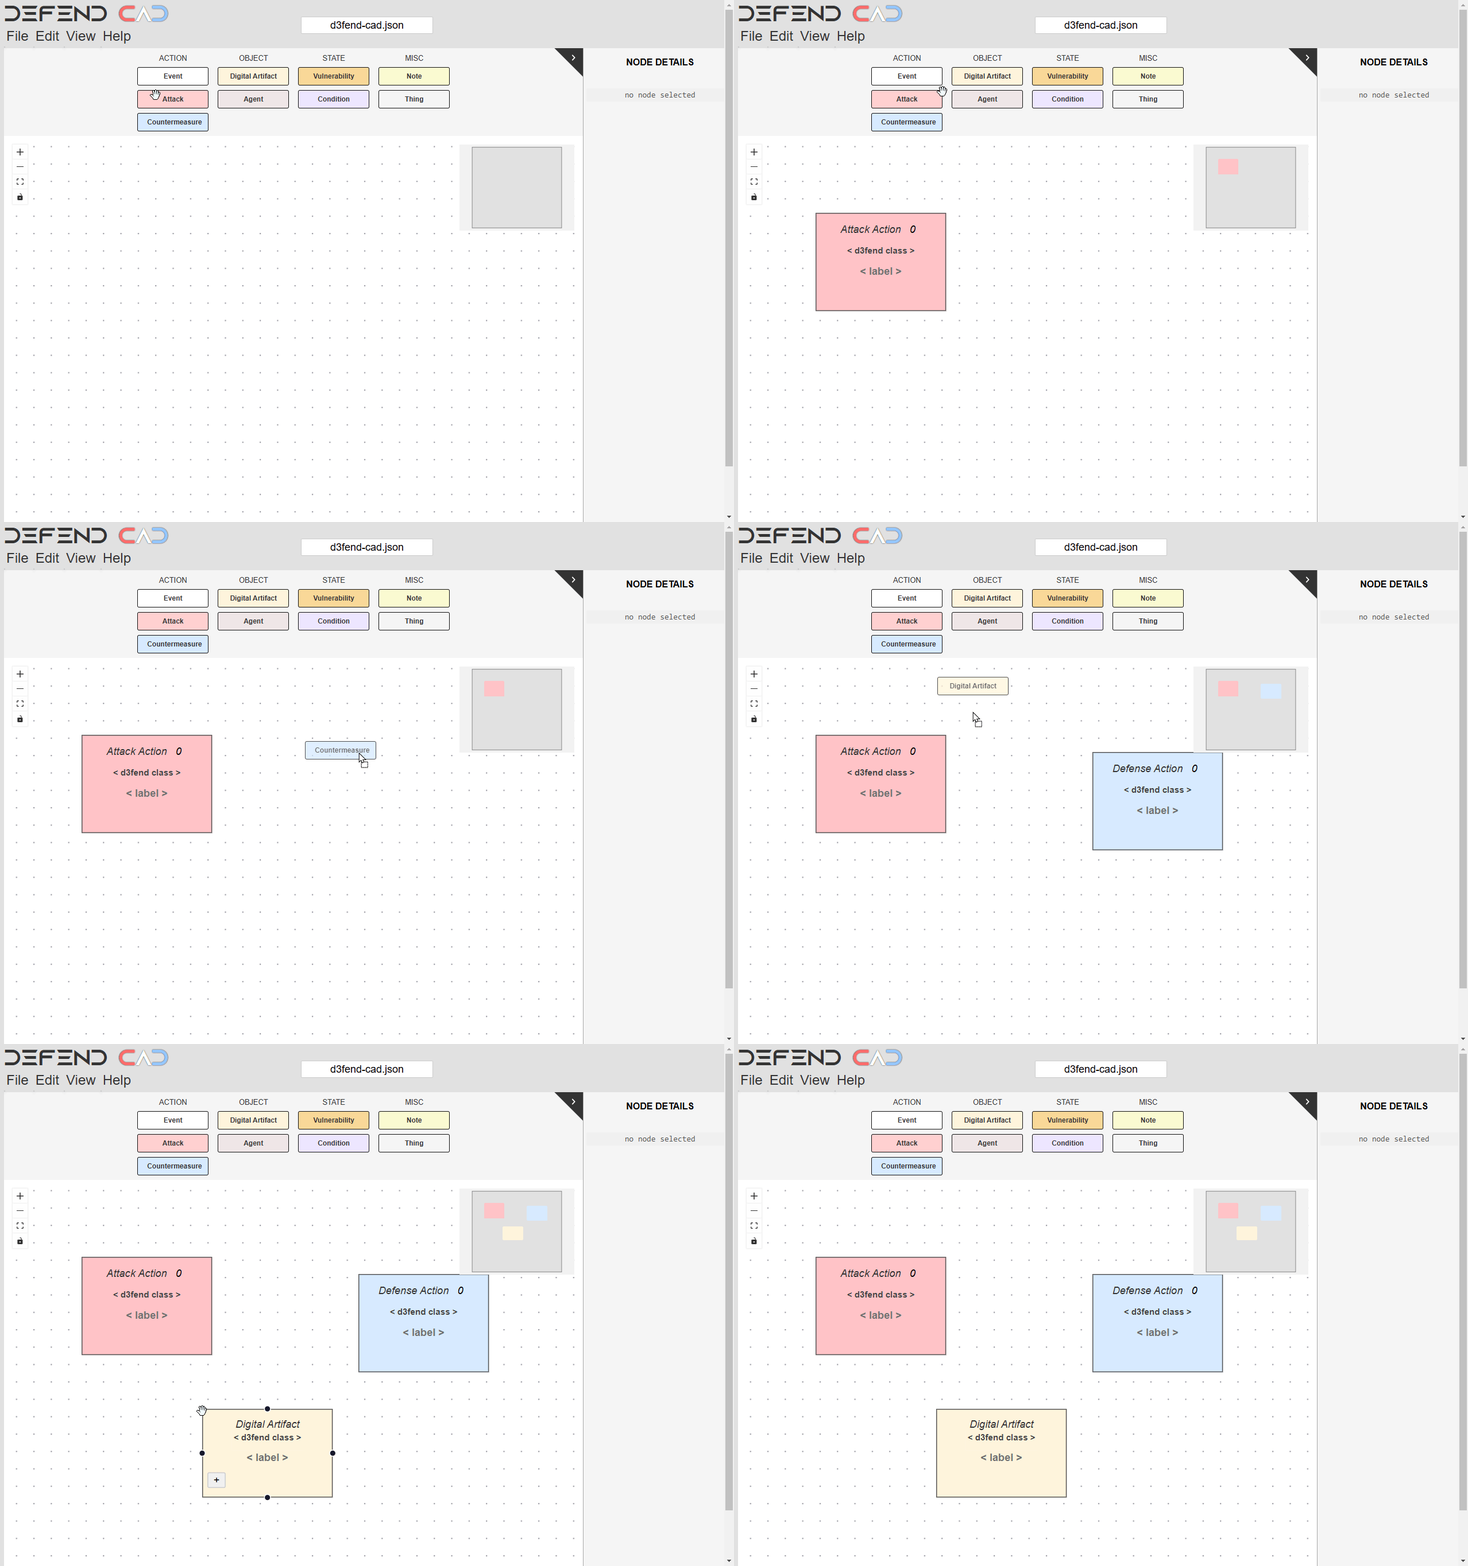
Creating a node is simple, just drag and drop the type you want onto the canvas, and a new node will appear. Right now, Attack nodes tap into the MITRE ATT&CK knowledge base, letting you choose specific ATT&CK techniques. Countermeasure nodes let you select from D3FEND’s defensive techniques, and Digital Artifacts nodes let you select from D3FEND’s artifact ontology. With CAD, you can map out the relationships between all these concepts, connecting offensive and defensive actions along with the artifacts they interact with. You can scroll in and out of the canvas to zoom.
Selecting a D3FEND Class
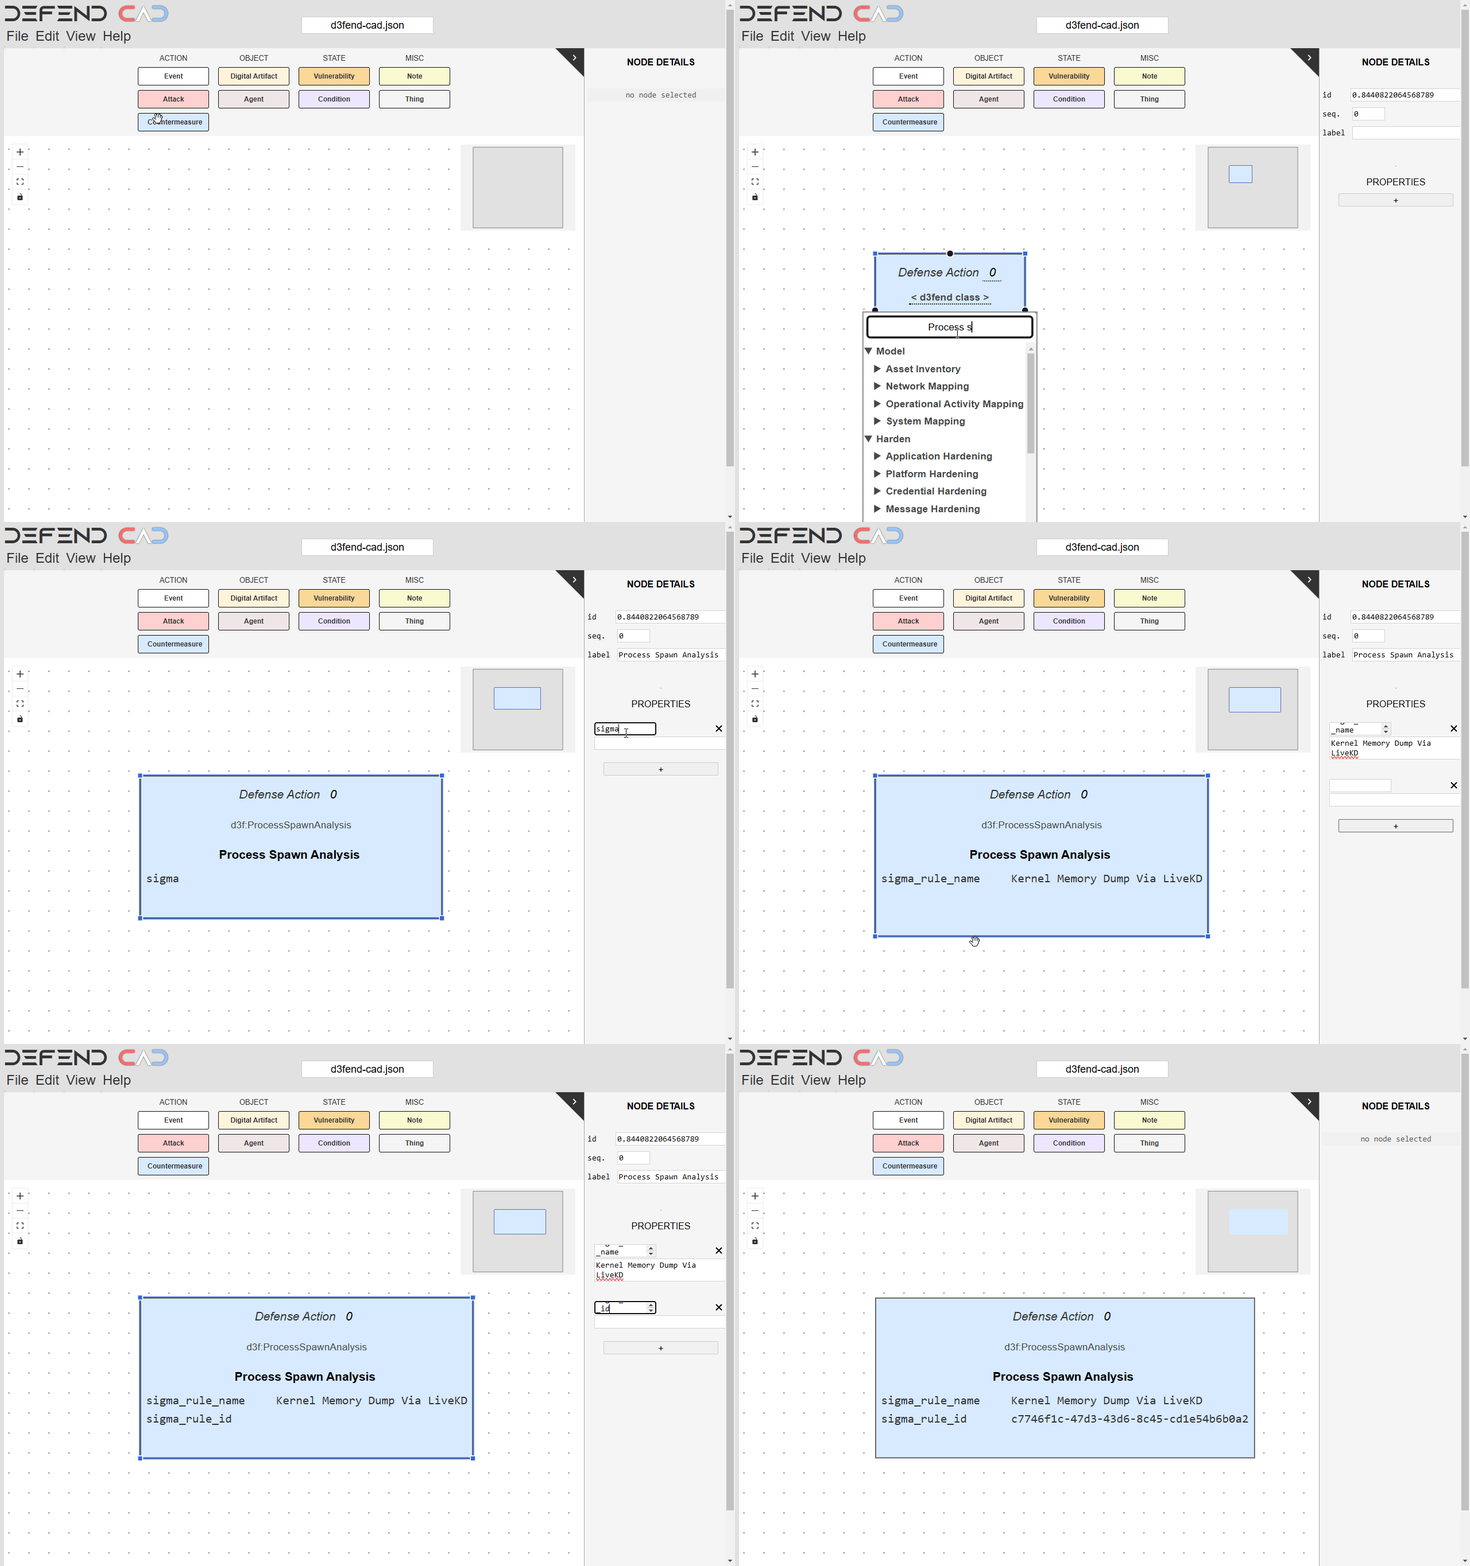
In the prior step, we created new nodes. Now, we can select a class for each node. Clicking on <d3fend class> displays a dropdown with all of the techniques currently in D3FEND and allows you to filter or select a specific technique. You can also add properties to the node by clicking the ”+” box on the node itself or in the pop-out sidebar.
Exploding the Node
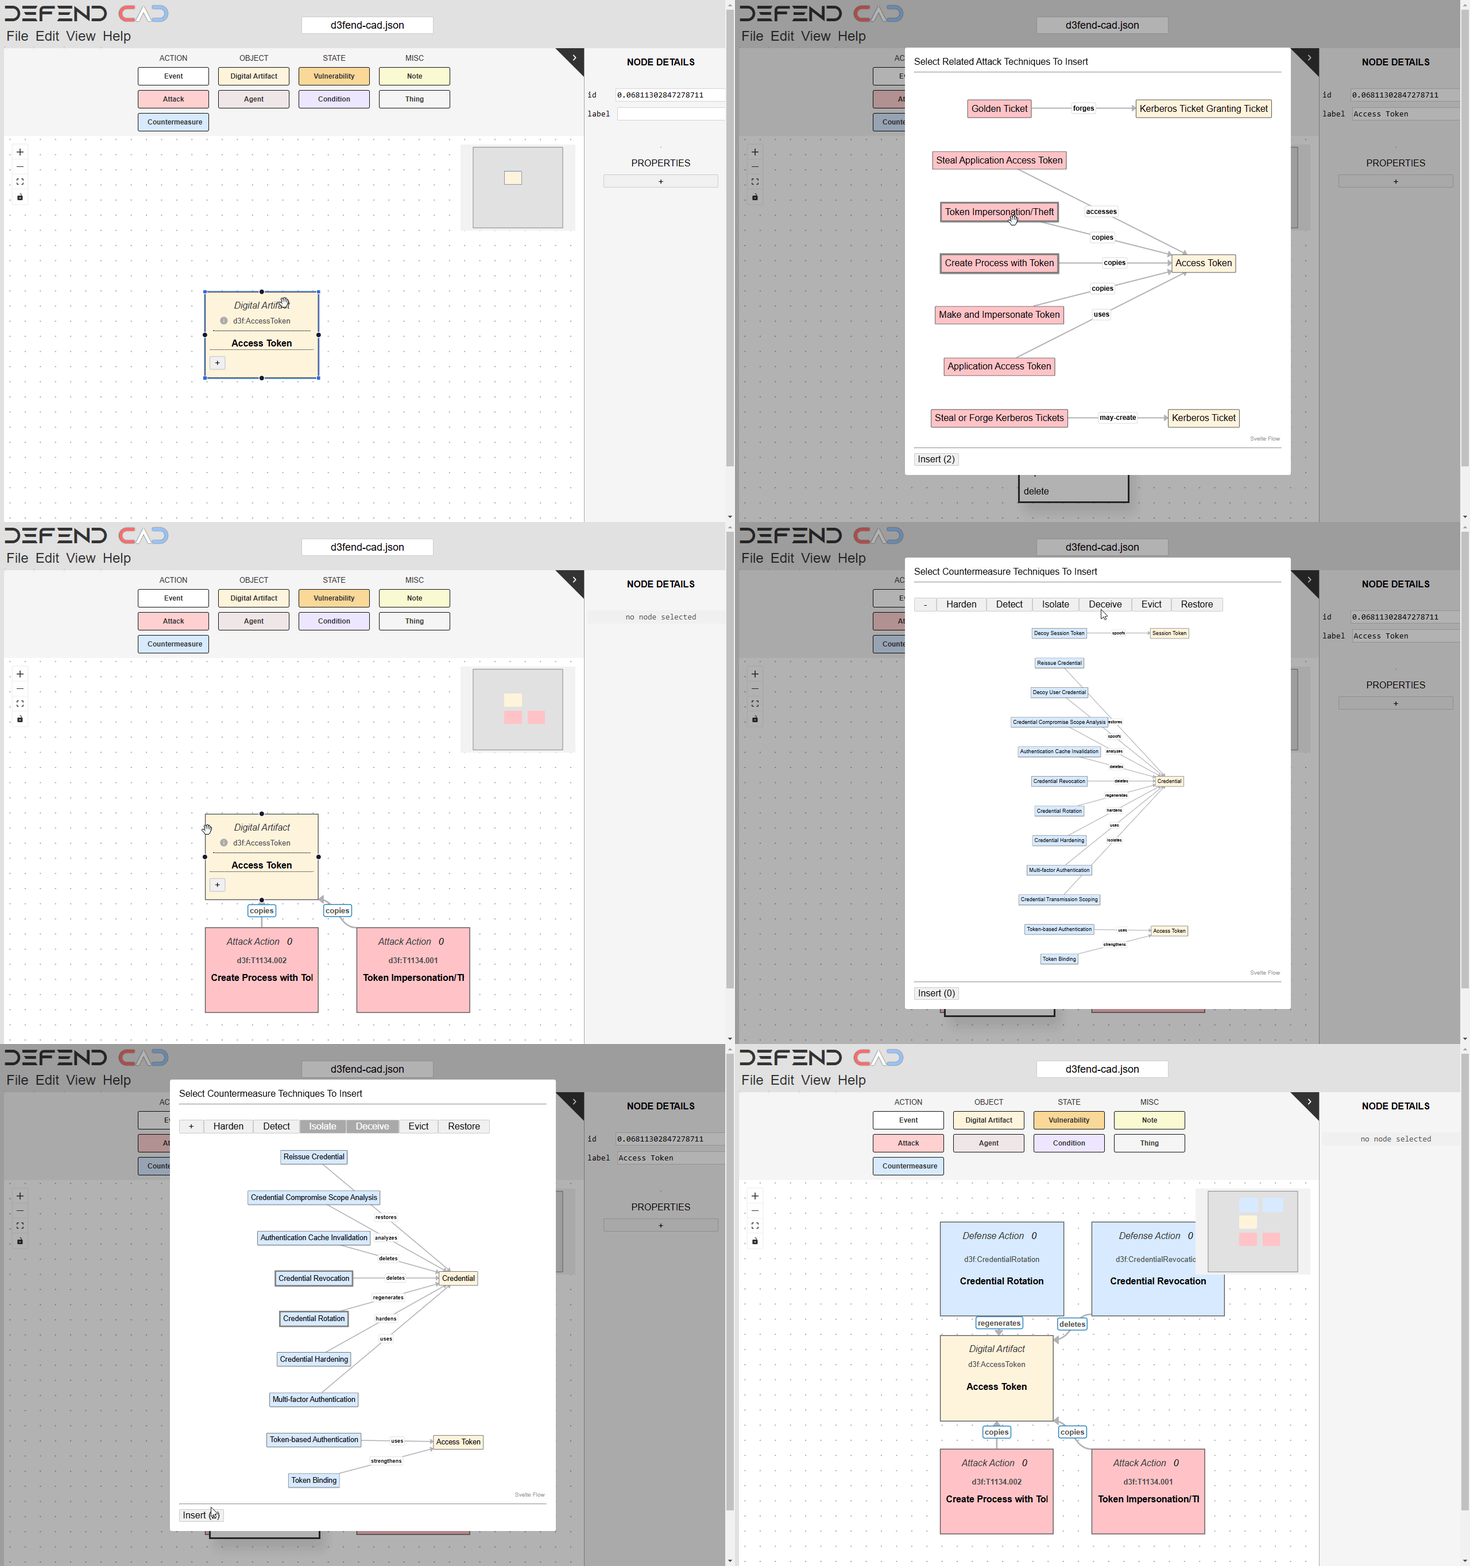
One of the key features of CAD is the ability to apply D3FEND’s knowledge about relationships between attacks, weaknesses, countermeasures, and artifacts and easily add them to the graph. In the example below, starting with an artifact of class “Access Token”, we can right click and select “attack the node” to see what ATT&CK techniques may involve Access Tokens. We can also select “defend the node” to see what D3FEND techniques apply to Access Tokens. Finally, “explode” has a menu of options that shows D3FEND artifact neighbors. You can then click on specific nodes you want to add, then click “insert” to add it onto the canvas. Experiment with this feature on countermeasure and attack nodes too! You can add relationships even if CAD doesn’t suggest it when you explode the node.
Creating and Selecting Edges
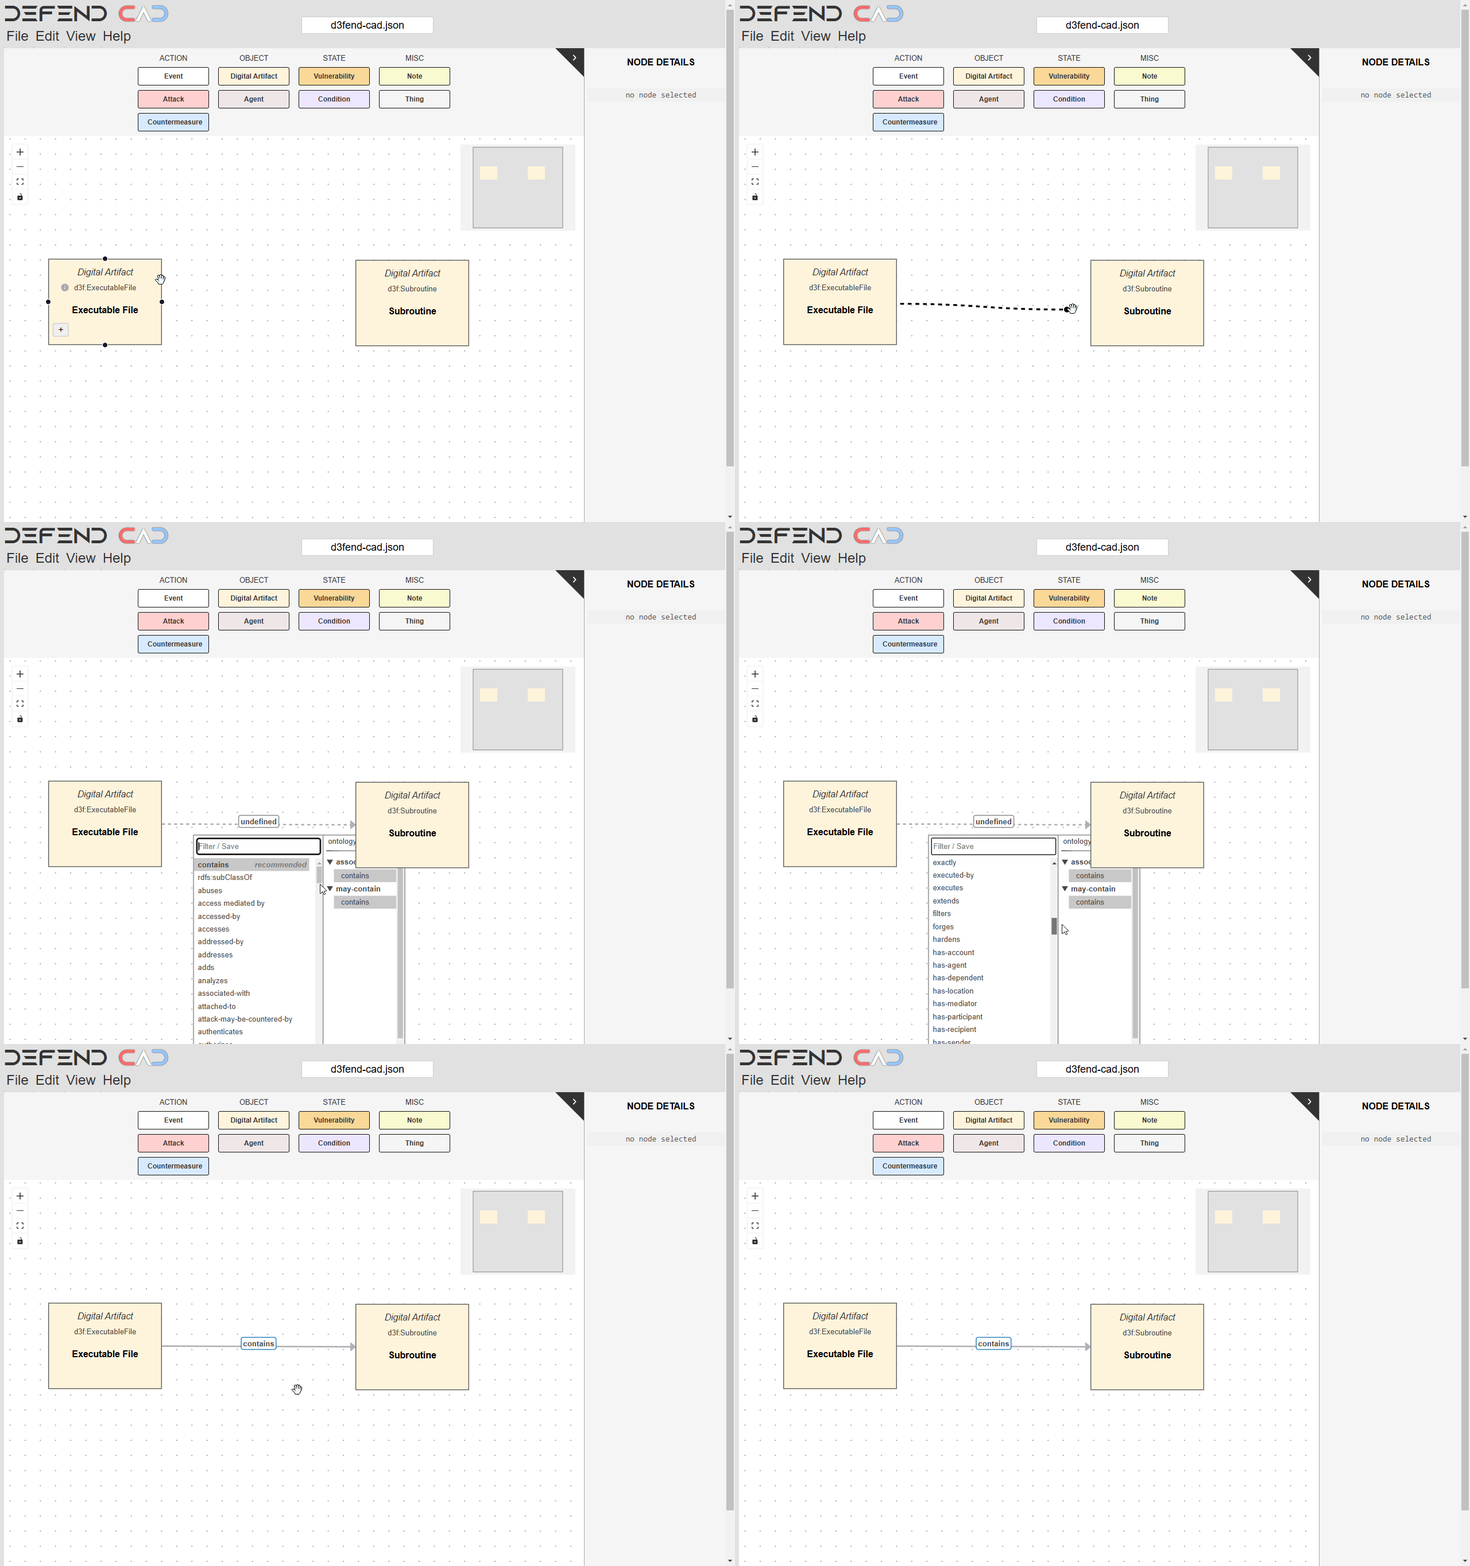
Edges are important to show the semantic relationships between nodes. Hover over a node and click one of the four dots, then drag while holding to connect to another node. Edges are labeled and when clicked, choose from a dropdown selection of D3FEND relationships, or add your own. We’ve also implemented a feature to show recommended labels between nodes.
Adding New Classes
Want to add a class but it’s not in the dropdown? No problem! Just type in the search box and prepend a : to the custom class name, then hit Enter, and the names will be given a green glow to denote your custom class. This works for edges too.
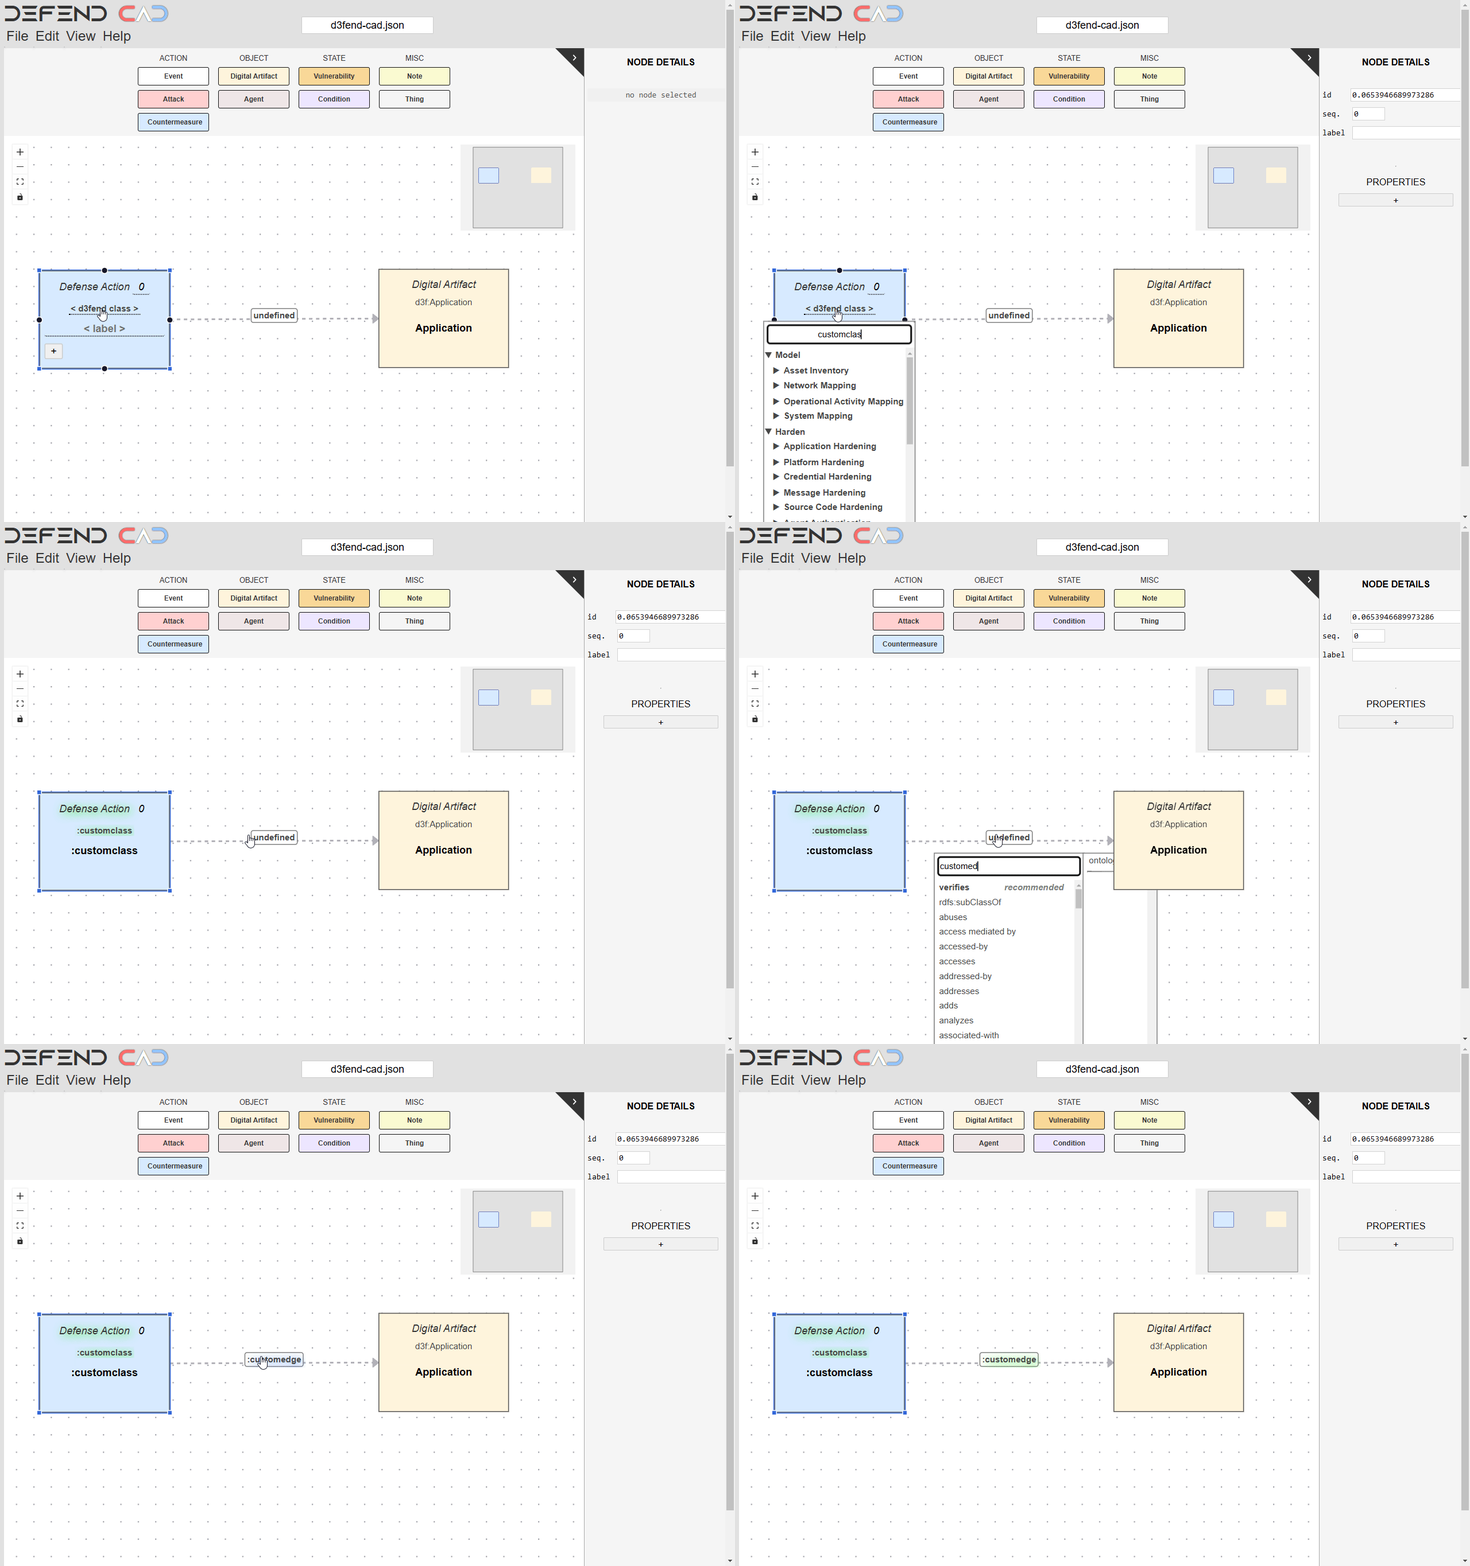
We love contributions from the community, so if you feel that a specific class or relationship has a place in D3FEND, create an issue ticket in our D3FEND Ontology GitHub.
Additional Features
D3FEND’s CAD tool also has the following features:
Runs solely in your browser
- Only requires server that serves static resources
- Easy to host on private networks
- The D3FEND static website GitHub repository is available here
Enables adding fine-grained detail and management of the scenario elements
- Naming of architectural elements to distinguish them in more detail
- Adding data properties to architectural elements to specify field values
- Manual addition of nodes connecting actions, objects, states, and notes
Export/Import
- Saving to CAD JSON and linked data formats
- Importing CAD JSON and STIX JSON
Sharing
- Create embedded HTML CAD widgets for your website
File > CAD Embed- Ability to create and share an entire blog post with D3FEND Graph Metadata
Edit > Graph Metadata
- Ability to create and share an entire blog post with D3FEND Graph Metadata
- URL-based sharing for smaller scenarios
- Create embedded HTML CAD widgets for your website
Customization Features
- Extending the D3FEND Ontology for contributions or customizations
- Ability to visualize and pivot between risk annotations on a graph with Risk Matrix Viewer
Analyze > Risk Matrix
A list of features and how to use them can be found in the
user documentation at:
CAD
Documentation. Note the user
documentation can also be reached by the Help menu item.
Essential Tips
Tip 1: Focus on artifact provenance
When building the Digital Artifact chain, consider artifact provenance. Ask yourself, how did this file, packet, configuration, etc. actually get to the target? This approach encourages investigation into the root cause of the incident and prompts deeper consideration of the relevance and effectiveness of countermeasures in preventing future incidents.
Tip 2: Be as specific as possible
When selecting a D3FEND Class on any of the node types, the more specific your selection the fewer matches you’ll get when you pull in related nodes via the right-click menu. For example, if you select “File” as the D3FEND Class for an artifact, you’ll get a lot of results. If you select “Document File” you’ll get more relevant inference results.
Tip 3: Model incrementally and save often
The mere act of systematically modeling or diagramming forces you to understand the problem better. Prior assumptions emerge and you can correct or improve your model as you learn more and ask better questions. Save files to a version control system like git to keep track of changes and to roll back to previous versions.
Stay Tuned
In this blog post, we’ve introduced the basics of getting started with D3FEND CAD.
This is the first in a multi-part series that will explore how CAD can assist individuals in various roles within the cybersecurity domain, as we delve into advanced features and share more tips and tricks.
In our next post, we’ll discuss how Threat Intelligence Analysts and Incident Responders can use CAD to diagram an adversary campaign.
In the meantime, check out our ShadowCat and Bushwalk D3FEND Graphs from the File > Example Graphs menu to see how to transform content from CTI reports into a D3FEND Graph!